Table of Contents
— Othmane Oubejja 2018/11/17 21:10
CorteXlab IoT Challenge: Uplink Optimization
Now that you have taken some control over our testbed and hopefully completed some tutorials, let's challenge ourselves !
We will provide a Wireless IoT framework made for the EPHYL Project
Before we start, you have to do the following:
- Form a team of THREE
- Give us the infos (team number, members' names & emails)
Why do we need your email? Well, the winning team members will receive a SigFox device and one USRP device, kindly given by our partners SigFox and National Instruments.
To verify your progress, there will be several checkpoints to be validated by one of the organizers (Leo, Matthieu, Othmane, Cyrille, Pascal, Tanguy …).
The groups
Each team will have a group number and thus have access to specific nodes following this table :
| Group | SSH login | Nodes to use | Frequency | TCP Port | Connected | Leader |
|---|---|---|---|---|---|---|
| 1 | tuto1 | node 3 and node 4 | 2.400GHz | 6663 | Djibrilla | |
| 2 | cadjih | node 7 and node 8 | 2.410GHz | 6664 | Cedric | |
| 3 | hezzeddine | node 13 and node 14 | 2.420GHz | 6665 | Ezzeddine | |
| 4 | dadja | node 17 and node 18 | 2.430GHz | 6666 | Dadja | |
| 5 | tuto4 | node 23 and node 24 | 2.440GHz | 6667 | Satya | |
| 6 | ymestrah | node 25 and node 27 | 2.450GHz | 6668 | Yasser | |
| 7 | tuto7 | node 28 and node 32 | 2.460GHz | 6669 | Thomas | |
| 8 | amayouche | node 33 and node 34 | 2.470GHz | 6670 | Abdou | |
| 9 | aparis | node 37 and node 38 | 2.480GHz | 6671 | Antoine | |
| 10 | lmroueh | node 16 and node 35 | 2.490GHz | 6672 | Lina | |
| 11 | gcallebaut | node 6 and node 9 | 2.500GHz | 6673 | Gilles |
Refresh this page, when you see your team name assigned it means you can start the Challenge!
Also refresh this page to see your progress and the progress of the other groups
The Challenge
Stage 0: Introduction
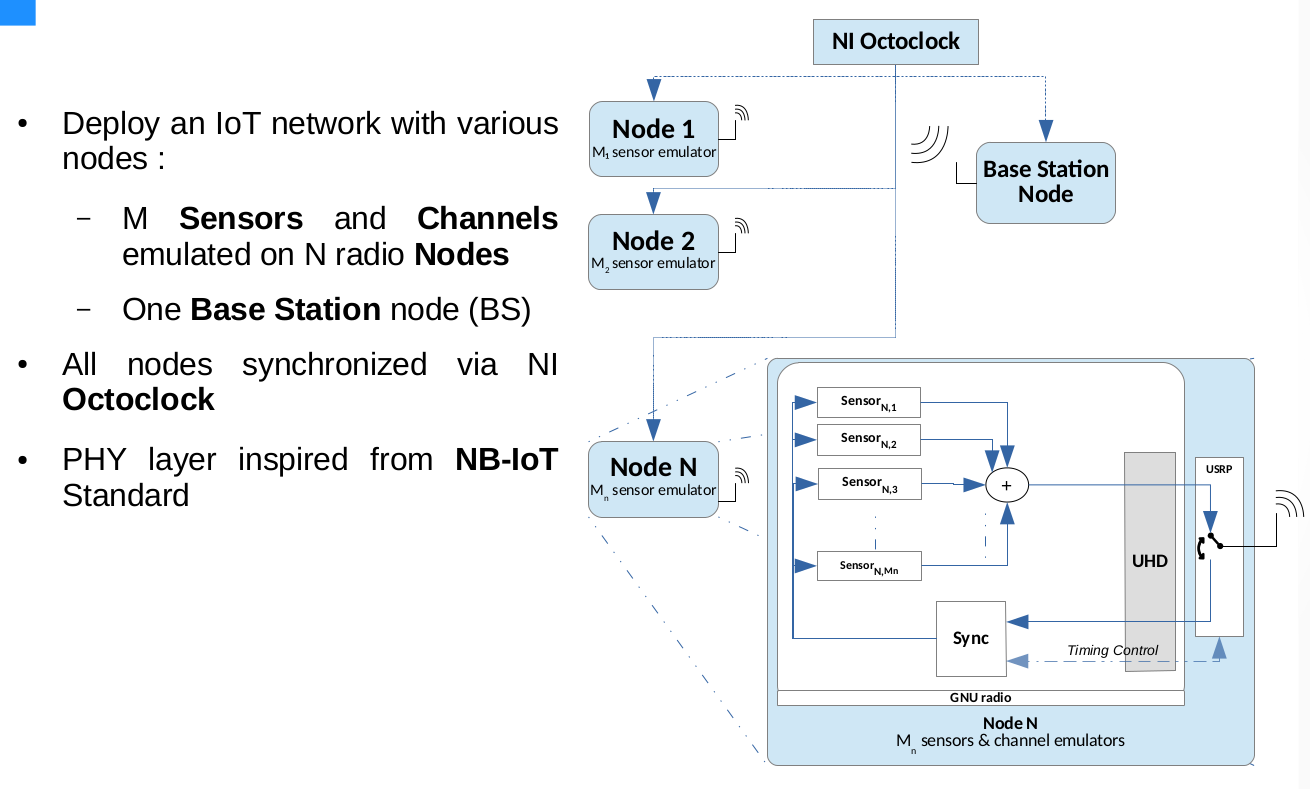
The EPHYL Framework consists of a couple of GNU Radio blocks and flow graphs. The purpose is to provide a modular communication system within the IoT context.
The framework contains 2 types of nodes : “Emulated Sensors” node and “Base Station” node :
Base Station
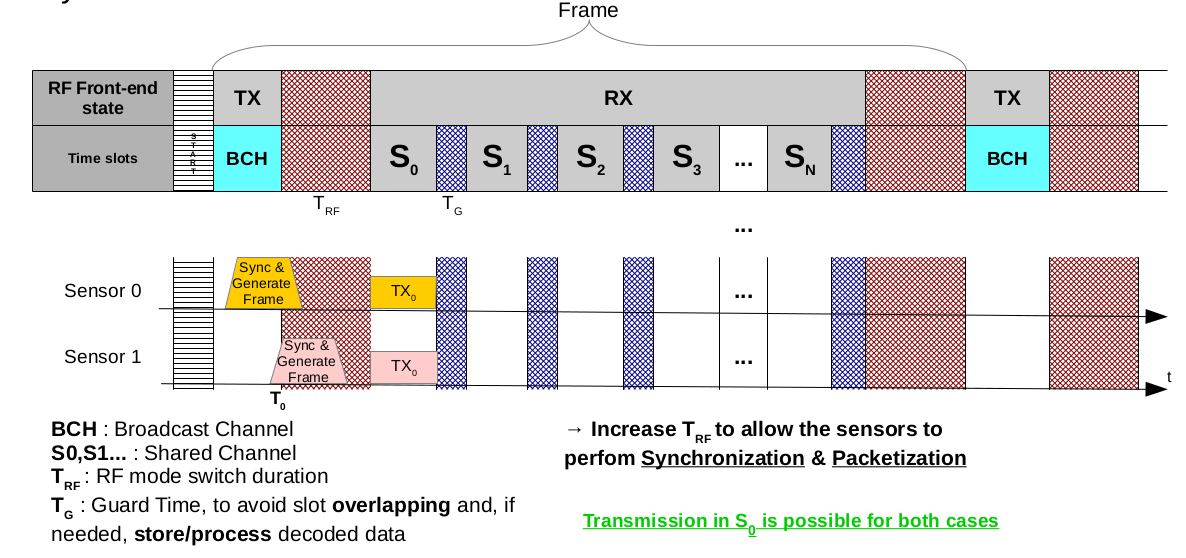
The BS follows a resource grid policy known by the sensors :
The figure is quite self explanatory. However, if you have questions don't hesitate to ask 
Sensors
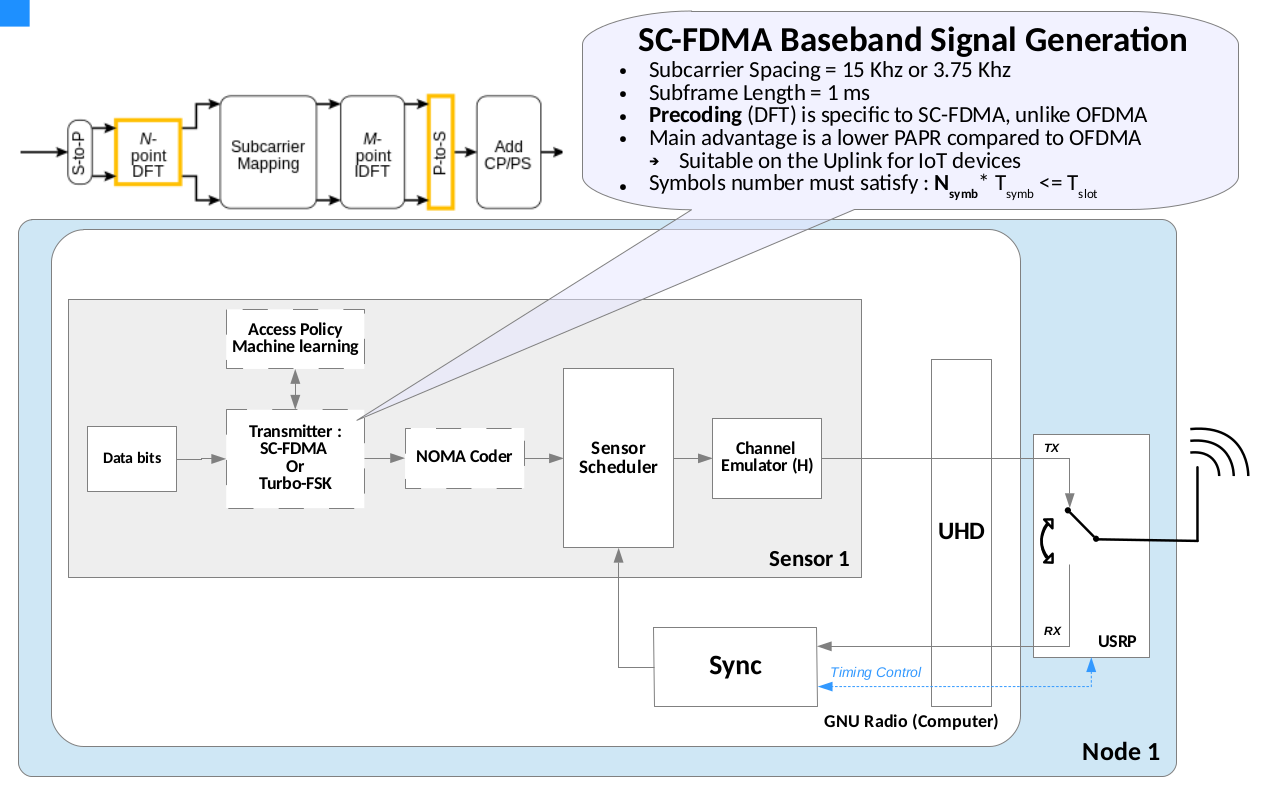
The sensor has several states which can be summarized as follow :
- Read data from somewhere (input .txt file)
- Choose one or more BS slot (when to send packets)
- Generate packets for each slot
- Detect beacon from BS, and estimate slots timing
- Transmit
- Repeat
The next diagram shows what happens inside one emulated sensor :
For this challenge, Turbo-FSK, NOMA coder and Access policy control are not available, because they are still being drawn up.
Can we emulate multiple sensors on the same node ? The answer is : Of course! By simply instantiating more sensor blocks in your GNU Radio flow graph and add up the output signals (See Stage 1 for an actual example).
Furthermore, in CorteXlab, all the nodes are synchronized via Octoclocks. This means that all emulated sensors are synchronized.
This makes CorteXlab a reliable testbed for implementation, validation and testing of state-of-the-art algorithms or communication systems.
Stage 1: Local testing
The goal is familiarize with the EPHYL Project GNU Radio framework, understand it, and try some stuffs.
REMINDER: If you you have never used GNU Radio Companion (GRC), it is HIGHLY suggested that you go check some tutorials. Especially Tutorial 3 and 6
When connected to CorteXlab (aka Airlock server), create a new directory “stage1”, copy this folder and put it in your home :
yourlogin@srvairlock:~$ mkdir stage1
yourlogin@srvairlock:~$ cp /cortexlab/homes/ooubejja/ws/local stage1/
yourlogin@srvairlock:~$ ls stage1/local
You should see this list :
A.txt  data_slot_mux.py  ephyl_sensor.grc   file_source_slot_ctrl.py   main1.py
B.txt  ephyl_bs_core.py  ephyl_sn_sched.py  file_source_slot_ctrl.py~  tag2msg.py
C.txt  ephyl_bs.grc      example.txt        main1.grc                  tag2msg_sn.py
Here are some details about the files :
.txtfiles : Input data files. Each line contains a slot number and its data string. IMPORTANT : Assign input data in ascending order ! (e.g, if you want to use slots=[3,0,5], the first line should be for slot 0, then 3, then 5)main1.grc: Main flow graphephyl-bs.grc&ephyl-sensor.grc: Custom EPHYL hierarchical blocks.py files: Custom EPHYL python sub-blocks (except main1.py, which is the main flow graph)
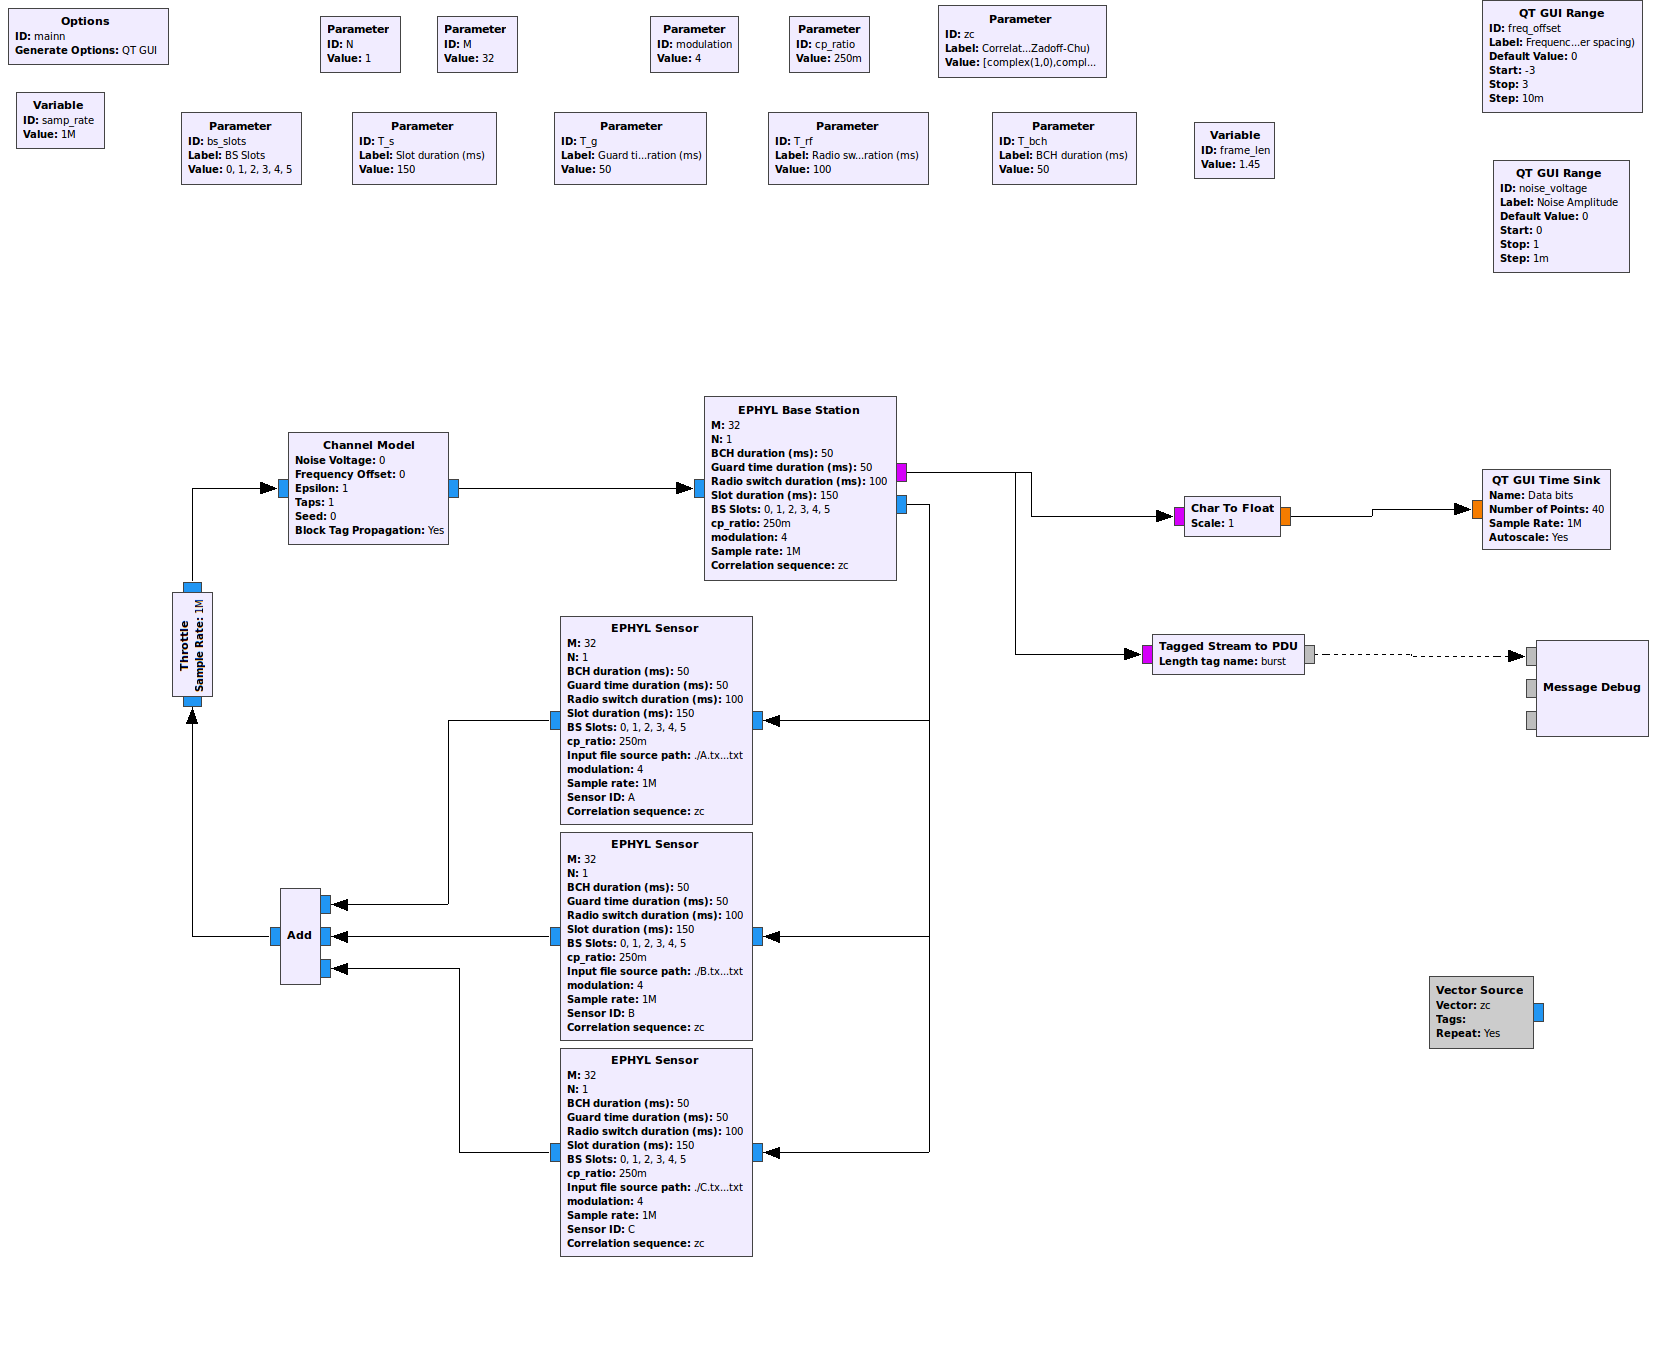
Good. Now let's have a look at the main flow graph :
yourlogin@srvairlock:~$ cd stage1/local/
yourlogin@srvairlock:~/stage1/local$ gnuradio-companion main1.grc
You can also download the directory and run the flow graph locally on your machine, in case of network lag.
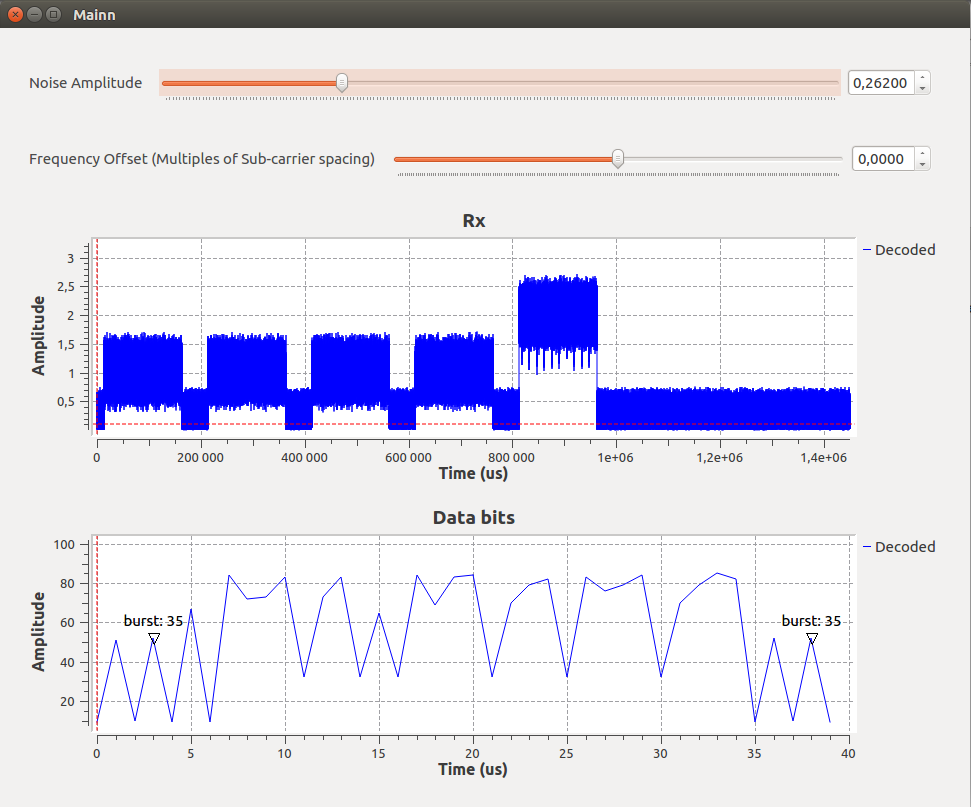
You should see something like this :
Check out the blocks carefully, understand what's happening then run the flow graph for maximum 6 or 7 seconds. You will see two things :
- 1) Sensor states in the terminal :
Executing: /usr/bin/python2 -u /cortexlab/homes/ooubejja/ws/local/main1.py

gr::log :DEBUG: correlate_access_code_bb_ts0 - Access code: acdda4e2f28c20fc
gr::log :DEBUG: correlate_access_code_bb_ts0 - Mask: ffffffffffffffff
[SN B] SENSOR SLOTS ARE :[1, 3]
[SN C] SENSOR SLOTS ARE :[4]
[SN B] Generate packet for slot : 1
[SN A] SENSOR SLOTS ARE :[0, 2, 4]
[SN A] Generate packet for slot : 0
[SN B] Generate packet for slot : 3
[SN C] Generate packet for slot : 4
[SN A] Generate packet for slot : 2
[SN A] Generate packet for slot : 4
[SN A] FOUND TAG
[SN C] FOUND TAG
[SN B] FOUND TAG
******* MESSAGE DEBUG PRINT ********
(() . #[0 	 A 	 T H I S   I S   A   T E S T   F O R   S L O T   Z E R O 	 0
])
************************************
...
...
...

************************************
******* MESSAGE DEBUG PRINT ********
(() . #[0 	 A 	 T H I S   I S   A   T E S T   F O R   S L O T   Z E R O 	 0
])
************************************
[SN A] REPETITIONS : 10
******* MESSAGE DEBUG PRINT ********
(() . #[1 	 B 	 T H I S   I S   A   T E S T   F O R   S L O T   O N E 	 1
])
************************************
...
...
...
...
...

******* MESSAGE DEBUG PRINT ********
(() . #[4 	 A 	 T H I S   I S   A   T E S T   F O R   S L O T   F O U R 	 4
])
************************************
[SN C] REPETITIONS : 9
[SN A] REPETITIONS : 9
******* MESSAGE DEBUG PRINT ********
[SN B] ================= FRAME FINISH =================[SN A] ================= FRAME FINISH =================
[SN C] ================= FRAME FINISH =================
- 2) Two time plots: Rx signal, and decoded data:
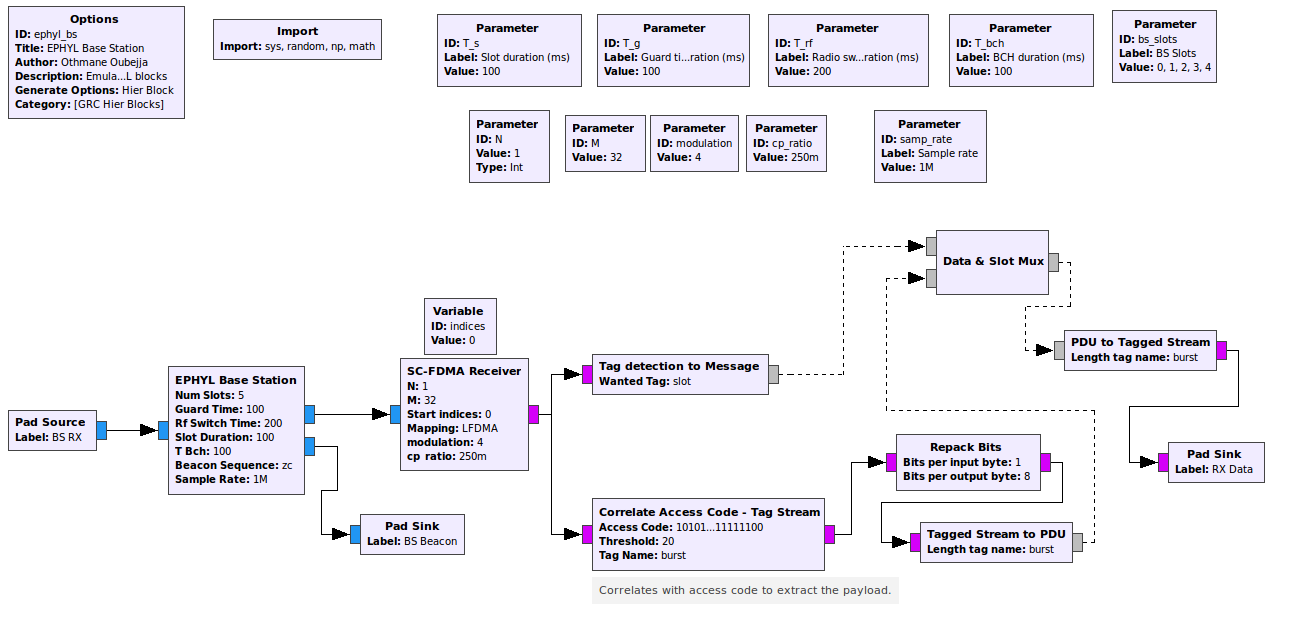
EPHYL Sensor and EPHYL Base station are hierarchical blocks. It means that they contain other blocks (same as Model hierarchy in Simulink). It is highly suggested to check what's inside of them.
If you want to do so, select the block and press this button →![]()
here is an example of what you can fin inside EPHYL Base Station block :
Can you interpret and explain what you are seeing ? (Amplitude in the last slot, burst tags in the second plot, etc)
You should be able to draw a system level analogy with the figures presented in Stage 0
You can also check the python sub-blocks (ephyl-bs-core.py, ephyl-sn-sched.py, etc)
Next, try to play “carefully” with the flow graph parameters (states duration, input data, modulation, etc). Make sure that you fully or mainly understand how the flow graph works before going to the next stage.
Stage 2: CorteXlab testing
Now that you can hopefully manipulate CorteXlab tools and EPHYL IoT framework, create a scenario where you use one node as a base station and another one as a multiple sensor emulator.
You can get started by modifying the flow graph main1.grc given in the previous stage, and create two other flowgraphs, one for the sensor emulator node and the other for the BS node.
If you have issues using CorteXlab, check out some of our cool tutorials and/or ask us 
Remember that experiments in CorteXlab require some modifications in GRC flow graph. Here are some things to check before running a task in the testbed :
- Check that the generation option is set to “No GUI”
- No plotting blocks, such as time/frequency sinks
- Verify Tx/Rx gains in UHD blocks
- The USRPs are synchronized via Octoclock, it means that they don't rely on their internal clock reference. so be careful with time and clock source parameters
- etc
Start experimenting and try to get some results as in the local tests. Maybe you'll have to strengthen the processing in the uplink transmission (modify some parameters, thresholds, etc)
UPDATE For Wednesday 21 :
If you have some difficulties creating GRC flowgraphs, you can get an example for each node here:
yourlogin@srvairlock:~$ mkdir stage2
yourlogin@srvairlock:~$ cp /cortexlab/homes/ooubejja/ws/cxlb stage2/
yourlogin@srvairlock:~$ ls stage2/cxlb
In stage2/cxlb you should have these files now:
A.txt             ephyl_bs_core.py  ephyl_sensor.py           main_bs.grc      scenario.yaml
B.txt             ephyl_bs.grc      ephyl_sn_sched.py         main_bs.py       tag2msg.py
C.txt             ephyl_bs.py       example.txt               main_sensor.grc  tag2msg_sn.py
data_slot_mux.py  ephyl_sensor.grc  file_source_slot_ctrl.py  main_sensor.py
Open mainbs.grc in GNU Radio, some parameters are already set to match CorteXlab setting (UHD blocks, generation options, reference source,etc). However, you should verify RF parameters (Freq, gain, sample rate,etc).
and mainsensor.grc
Also, don't forget to adapt scenario.yaml to your actual scenario.
Stage 3: Raise the bar !
Now that you understand how the Sensor and Base station communicate, let's see if you can improve some aspects of the design by adding/modifying blocks, or suggest some design changes based on logic proof or rationale.
As you may have seen, not all packets are decoded fully, and nothing was planned to counter channel and hardware impairments (multipath, noise, offsets and distortions)
The proposals can be relevant to : PHY/MAC layers, data compression, channel coding, throughput, interference management, etc.
Finally, keep in mind that, even after the Winter school, you can continue working on the framework (or anything else) anywhere and any time, since you have your personal FIT/CorteXlab account.
And, please, if you ever use the testbed in your research, don't forget to cite FIT/CorteXlab in your publications
THURSDAY 22 UPDATE :
2pm-3.30pm → Add final touch and prepare a presentation (if any)
3.30pm-4.30pm → Present your contribution
4.30pm-5pm → Winners announcement

