**This is an old revision of the document!**
Table of Contents
Connect to the CortexLab server
Note: If you do not have a CorteXlab account yet, please refer to the account section first.
Currently the access to the CorteXlab server is done via a direct ssh connection to the server named pandora (that might be refered to as airlock throughout this wiki).
Connecting using Linux/Unix
On a Linux/Unix host, the SSH connexion to pandora can be done with the command:
$ ssh -X -v -p 2269 pandora.citi.insa-lyon.fr
-X is used for X forwarding (do not forget to execute xhost+ on your own machine)
-v is used for verbose mode
-p is used to specify the port through which the SSH connection is opened
Connecting Windows user
Thanks to Putty you can open SSH connections to remote hosts. To do so, you must configure your connection.
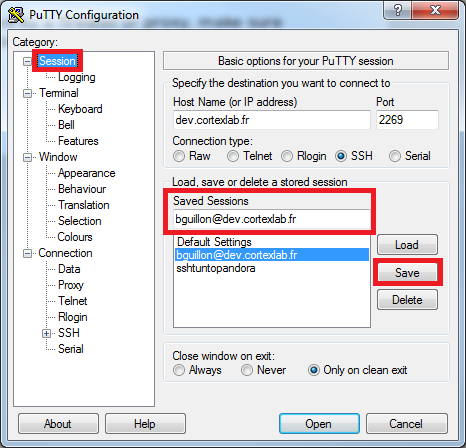
Step 1: Set the Host
Choose SSH as the communication protocol and set the hostname of the server you want to reach, in this case pandora.citi.insa-lyon.fr (Dev CorteXlab) on port 2269.

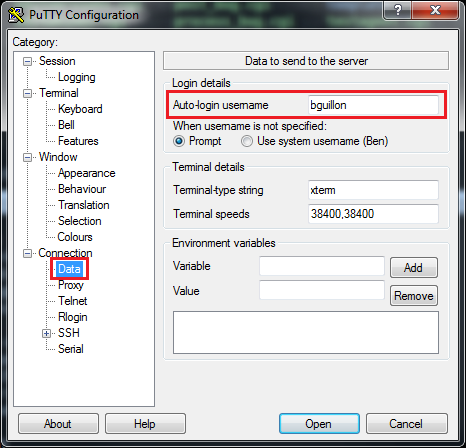
Step 2: Set the login username
Choose your login username in order not to re enter it every time you log on CorteXlab. This is your CorteXlab account name (i.e. username).
Step 3: Set the SSH keys to use
Of course, the authentication on CorteXlab is based on RSA keys (no password authentication is allowed).
You have to give the path to the private key file (and your public key should be alongside it, i.e same directory and same file name prefix).
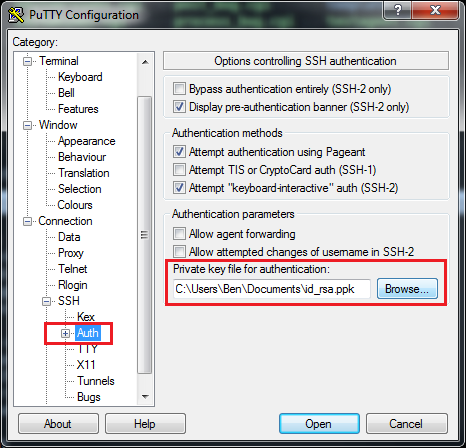
More info on the key generation: ssh_key_help
Step 4: Save the parameters
In order to use them next time, save the parameters as a session.
You will be able to load them directly from this menu afterwards.
Step 5: Log in through SSH
Just click the “open” button, no pics included this time ;)
Connecting MacOS user
TBD
Once connected
You should have access to your home directory on pandora, on which you should find:
- A README file
- A directory
examplescontaining task examples - A directory
resultscontaining results of you experiments
Launching an experiment on the USRP board requires the following steps:
- Reserve a number of USRP nodes (not implemented yet)
- Create a Task as a directory (say
taskFolder), this is explained in the Create a task section. - Activate the task creation in Minus:
$ create_task taskFolder
This will result in the creation of a file taskFolder.job
- Launch the task with minus:
$ submit taskFolder.job
- Analyze the results
Create a Task
Creating a task for an experiment amounts in:
- providing the programs targeted to each USRPs included in the experiment (explained in the Providing USRP programs section)
- providing a
scenarion.descfile necessary for minus to launch the task (explained in the Providing scenario file section)
“
Providing USRP programs
In CortexLab, USRP are programmed using the GnuRadio toolchain. GNU Radio is a free & open-source software development toolkit that provides signal processing blocks to implement software radios. In order to avoid arbitraty changes comming the GnuRadio developpement community, CorteXlab maintain a copy of the GnuRadio repository which contains exactly the same version of GnuRadio package that the one installed on the CorteXlab nodes. This distribution can be downloaded Here
Programming a USRP with GnuRadio is not an easy task, the user should be familiar with that, and should refer
to the GnuRadio website if it is not. A CortexLab program consists of a number of GnuRadio python script executed on the PCs connected to the USRPs (of course many USRPs can share the same GnuRadio code). For instance, on the my_task example present on the CortexLab account, the following script should be executed by the PC connected to the USRP1:
$ benchmark_tx.py --antenna="TX/RX" --tx-amplitude=0.2 -v -W 2M -f 2.49G
The command could be anything, it is up to the user to decide the name of the script, its parameters etc. The only constraints is that it should be able to run with the GnuRadio packages present on CorteXlab. It the user wants to add more packages or libraries, he should put the files in the Task directory. For instance, on the my_task example, the benchmark_tx.py script uses the transmit_path class which is defined in the tansmit_path.py package, which is present in the my_task directory.
Again, using the my_task example, this example uses 2 USRPs (one transmiting, the other receiving), the command to be launched on the PC connected to USRP2 is:
$ benchmark_rx.py --antenna="TX/RX" --rx-gain=25 -v -W 2M -f 2.49G
Once the programs to be launched on each USRPs are set up, remains to indicate the time duration of the experiment. Minus will stop the experiment after this time duration, and the result will be available for analysis.
Providing a scenario file
The scenario file is the Minus script that indicates to Minus which program will be launch on which USRPs and how long the experiment will last. For each node (i.e. each usrp), it should indicate:
- a command (or entry) which is the program executed on the PC connected to the USRP
- a commande line option (or parameter) which is the parameter given to the command
- an exit script (optional) which is executed at the end of the experiment
In addition with these information, the scenario file should contain the description of the experiment and a duration in minute. The exact syntax of the scenario description file is presented here.
Below is a simple example used for the my_task example:
# Example scenario description file
desc base scenario for CorteXlab
#
# Experiment maximum duration  integer (minutes)
durat 3
#
# Node list
#
node2:
   entry benchmark_rx.py
   params --antenna="TX/RX" --rx-gain=25 -v -W 2M -f 2.49G
   exit none
node1:
   entry benchmark_tx.py
   params --antenna="TX/RX" --tx-amplitude=0.2 -v -W 2M -f 2.49G
   exit none